Configure messaging provider templates
Message provider templates dictate the appearance of the message. They are composed primarily of attributes, all of which are surfaced in the template's JSON payload as key/value pairs. Template attribute categories include:
- Campaign attributes, such as name, start_date, and end_date.
- Custom attributes.
- Custom event attributes, such as name and payload.
- Offer attributes, such as name, description, logo, and terms.
- User profile attributes, such as name, city, state, dob, email, and gender.
While these attributes are pre-determined for the module, you can consult with your SessionM contact to add new ones.
Once you've selected attributes for your template, the system adds them to the JSON payload. When it does, it adds them at the top level and provides a syntax validation check. If you want to created nested attributes, you need to manually customize the template's JSON payload within the text field.
Template attributes are pre-determined. However, you can consult with your SessionM success contact to add new ones.
About this task
The procedure detailed below applies to nearly all of the messaging provider templates available in your SessionM Platform implementation. Only the SendGrid messaging provider requires a different approach for setting up a template. Since SendGrid happens to be the default editor for templates created in the SessionM Creative Templates Module, the creation or modification of SendGrid templates for messaging providers is also handled by the Creative Templates module. .This function is accessed seamlessly by clicking the provider's templates hyperlink located on the Messaging Providers page.
Steps
- On the Admin & Rights 2.0 dashboard, under Platform Configurations, click Messaging Providers. The Messaging Providers page opens, displaying a table of messaging providers.
- In the Messaging Providers table, locate the provider instance that you want to create templates for.
- Then click on the corresponding hyperlink in the Templates column of the table to open the Messaging Templates table for the provider that requires a template. Note that the hyperlink displays the current number of templates defined for the related provider.
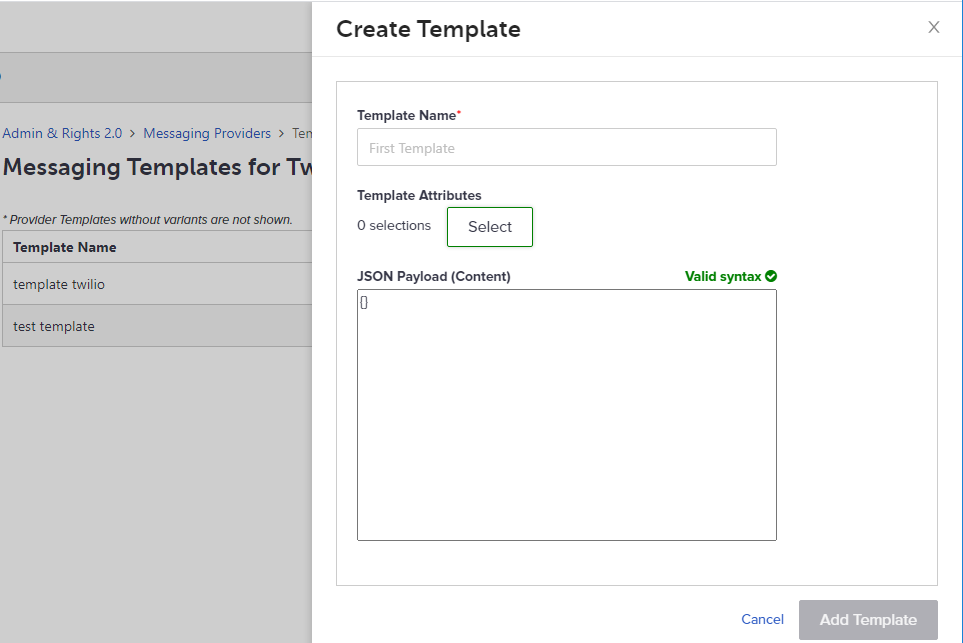
- From the Messaging Templates table for the provider, click Add Template to open the Create Template window:

- Specify the template's name.
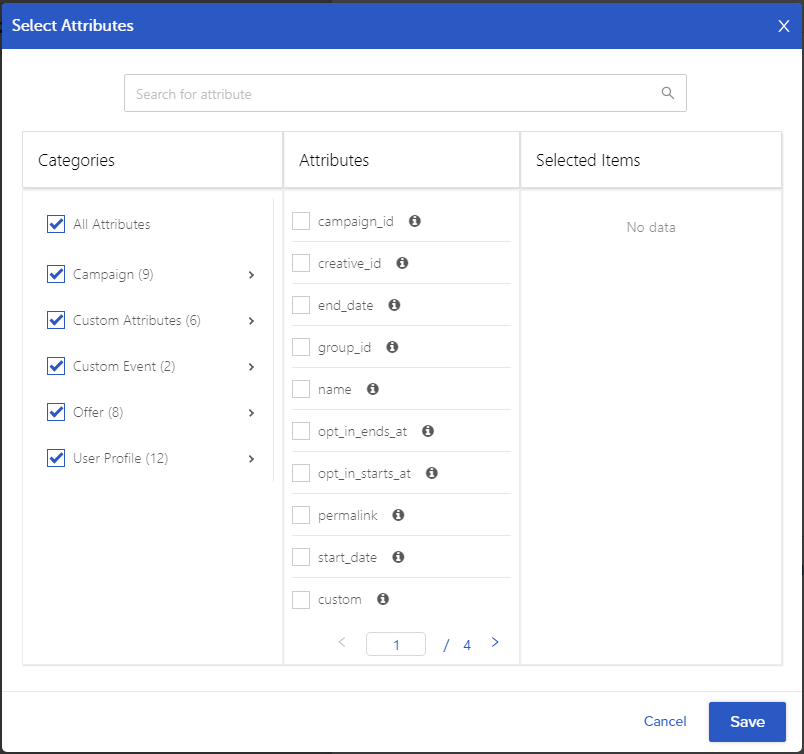
- Add template attributes by clicking Select, which opens the Select Attributes window:

- Enable the category of attributes you want to review for inclusion in the JSON payload for your template. If you aren't sure which category to view, you can select All Attributes.
- Now browse the attributes available in the category, and click the checkbox for the first attribute you want to include in the payload for your messaging template. Upon clicking the attribute, the "Choose to customize or default Variable Name" dialog opens, pre-populated with values in the Default Variable Name and Variable JSON fields.
- If you want to customize the attribute's name as it's displayed in the JSON payload, specify a value in the Customized Variable Name field. Or, alternatively, you can simply accept the default value appearing in the Default Variable Name field.
- Click Add Variable. The new attribute appears in the Selected Items column of the Select Attributes window (table).
- Repeat steps 8-10 for additional attributes.
- Click Save. You are returned to the Create Template window, which now displays the JSON payload for the newly added attributes in the "JSON Payload (Content)" section of the window.
Note: When the JSON is valid, the label above the payload window displays a green "Valid syntax" message; when it isn't, the label displays a red "Invalid syntax" message. You may need to move your cursor outside of the "JSON Payload (Content)" section to update the validation message. - Make any additional changes you want to the JSON payload, including modifications that nest or format template attributes.
- Click Add Template.
The new template is configured and appears at the top of the table.